OER4Schools/ICT/viewing slideshows: Difference between revisions
No edit summary |
m (Bjoern moved page OER4Schools/ICT/slideshow in browser to OER4Schools/ICT/viewing slideshows) |
Latest revision as of 13:20, 10 September 2013
![]() Same-task group work (20 min):Practical activity in small groups on the exploration of a slideshow using the a web browser. In the last session, we looked at a basic netbook familiarisation. Make sure that you are happy with that activity so far. Discuss any issues with your partner.
Same-task group work (20 min):Practical activity in small groups on the exploration of a slideshow using the a web browser. In the last session, we looked at a basic netbook familiarisation. Make sure that you are happy with that activity so far. Discuss any issues with your partner.
We now use the browser to display images, and do a learning activity. Take a netbook per pair, start the netbook, open the browser, and navigate to this page:
Consider the following questions:
- What are the technical difficulties and challenges to you running this activity now?
- What do you think will the challenges be when you run this activity with your students in class? (Make notes on this in your reflective journal - we will refer back to these when you have done this activity in class.)
- What can you say about how you might classify the images?
Note that in the 'follow-up' you will try the same activity with your students in the classroom, so it is very important to anticipate any issues that may arise.
Note: You can download the slideshow for local use here: File:Images of living things slideshow.zip
![]() Same-task group work (10 min): Pair work on viewing a slideshow in Open Office. You can download an Open Office slideshow of images of living things by clicking on this link here: living things slideshow.odp (info). This slideshow contains mostly the same images as the browser based slideshow but it has some advantages and perhaps some disadvantages over the browser based one. Discuss these advantages and disadvantages with a partner after you have experimented with opening the slideshow and hiding slides.
Same-task group work (10 min): Pair work on viewing a slideshow in Open Office. You can download an Open Office slideshow of images of living things by clicking on this link here: living things slideshow.odp (info). This slideshow contains mostly the same images as the browser based slideshow but it has some advantages and perhaps some disadvantages over the browser based one. Discuss these advantages and disadvantages with a partner after you have experimented with opening the slideshow and hiding slides.
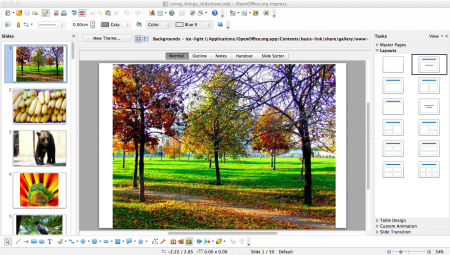
Here is a screenshot of what you will see when you open the slideshow using Open Office Impress.
As you click on the thumbnails on the left hand side they appear in the workspace. If you hover your mouse over a thumbnail on the left hand side you will get the option to Start Slide Show/Hide Slide/Duplicate Slide.
- Experiment by hiding all the slides of animals, by clicking Hide Slide on each thumbnail of the slide that you want to hide.
- Start the slide show by hovering over the thumbnail of the first slide and clicking the Start Slide Show option.
- Proceed through your slideshow of plants/trees/vegetables/fruit by right clicking the mouse or using the forward arrow on the keyboard.
- Unhide slides by clicking the Show Slide option that appears when you hover your mouse over hidden thumbnails.
- If you accidentally duplicate a slide you can reverse this by clicking Edit (next to File) and choosing Undo from the drop down menu.
- To close the slideshow, click File on the bar at the top of the screen and choose Close from the drop down menu.

