Introduction to OER4Schools
An introduction to the interactive Zambian classroom
The aims of Unit 1 are to:
- understand principles of interactive teaching - with and without ICT,
- see illustrations and discuss issues involved in implementing it,
- think about changing one’s own practice, and
- develop ways of working with colleagues to reflect on practice, share ideas and trial new strategies.
Brainstorm on interactive teaching
Consider the following questions:
- What is interactive teaching?
- What interactive techniques do you know?
- How often have you used such techniques?
Whole group brainstorm.
Suggested time …. [we should add suggested times for these sections]
Want to hear from everyone, don’t worry if you’re not sure, have a go at making a suggestion... we will develop our collective understanding as time goes on [what are teachers’ expectations?].
If participants are not very forthcoming, probe them with additional questions, eg what do you think interactive teaching might be? Is it the same as learner-centred teaching?
Record the brainstorm. The facilitator writes on a large sheet of paper, or makes notes for everybody to see on the overhead projector. Alternatively, participants write on small pieces of paper which are placed on a table. If there are no facilities, then it is ok to note make a record.
If you are part of our “facilitators program”, use the tools provided to capture the discussion.
Examples of interactive teaching in Zambia
Many African teachers aspire to be interactive teachers. Yet, interactive teaching is not common in the African classroom. However, it can work in this context!
The following clip shows Eness, a teacher in a community school near Lusaka interacting with a Grade 3 class. Watch the clip of her class discussion about Is a bat a bird?
![]() Stimulus (11 min). Watch video:
Stimulus (11 min). Watch video:
VIDEO
Eness_vertebrates_12.mp4
The description of the video
Video/Eness vertebrates 12.mp4, https://oer.opendeved.net/wiki/Video/Eness_vertebrates_12.mp4, Duration: 4:19 watch on YouTube, local play / download options / download from dropbox)
(Clip shows whole class discussion of ‘is a bat a bird?’ + 1 min clip - set unresolved problem as homework)
- What have you noticed?
- How are the learners taught?
- How do you think they will react to the homework task?
- Is this classroom different from yours?
- What is interactive teaching?
Issues to discuss
noisy but productive - A classroom can be noisy and productive at the same time
interactive = inter-action (with view to sense making; i.e. purpose of inter-action is to make sense)
children making sense of ideas for themselves, developing their own classifications, relating to what they already know...
teacher not telling answer, asking students to investigate for themselves
Facilitator needs to know how to deal with criticisms (such as too noisy, too much chaos, not productive)
The road is long. But it can be done!
![]() Stimulus (11 min). Show brainstorm clip:
Stimulus (11 min). Show brainstorm clip:
VIDEO
Eness_vertebrates_1.mp4
The description of the video
Video/Eness vertebrates 1.mp4, https://oer.opendeved.net/wiki/Video/Eness_vertebrates_1.mp4, Duration: 2:43 watch on YouTube, local play / download options / download from dropbox)
This clip from the same Grade 3 classroom illustrates how the teacher solicits (and records) different students’ views without evaluating them.
Note that the clip shows the start of a lesson but it can be done at any point in a lesson. It shows a brainstorm – with unique contributions, allowing time to think first, ‘no hands up’ technique too.
Workshop participants continue with the discussion.
- What have you noticed this time?
- At what point(s) in the lesson could this be used?
- What do you think the students are learning from this?
- How are they learning?
- Can brainstorming be used with large classes too, where there isn’t time for everyone to contribute each time? How would you adapt it for this?
The facilitator now summarises the outcomes of the discussion, first elaborating the previous brainstorm record, and then summarising by emphasising the points below and including any key points the participants have made.
Summary: The key to interactive teaching is teachers shifting “from telling to listening” and learners shifting from receiving information to making sense of it for themselves.
How can we “listen” to learners? What does that mean in practice?
Facilitator describes own experience of shifting to interactive teaching and how it is different in his/her classroom now…
Evidence for impact of interactive teaching (optional)
Generally we have experienced that teachers welcome interactive ways of teaching. However, it is possible that teachers may object or have major concerns to the interactive teaching shown in the videos as well as what has emerged from this discussion. For instance, they may say that this just will not work in their classroom, that it may not work with large classes, or perhaps that such styles of teaching would not be welcome by parents or head teachers for various reasons.
At this stage, you could introduce interactive teaching as an international trend. Research evidence from different countries shows that this kind of active learning is both motivating and far more effective for learning than direct instruction (“chalk-and-talk” or lecturing). In particular independent, collaborative or oral work, as well as questioning and whole-class discussion that encourage pupils to grapple with ideas are effective. They lead to long-term and deeper learning rather than memorising facts (resulting in short-term, superficial learning).
The following video clip may help to reinforce the point.
One Zambian teacher’s experience
![]() Video (11 min). Agness video here (Agness_eLA_contribution.mp4) http://sms.cam.ac.uk/media/1093072
Video (11 min). Agness video here (Agness_eLA_contribution.mp4) http://sms.cam.ac.uk/media/1093072
This two minute clip features Agness Tembo, a Grade 2 teacher from Chalimbana Basic School located in a rural area of Zambia. She is presenting at the e-Learning Africa Conference 2010 her own experiences of participating in Phase 1 of the OER4Schools research project. She talks animatedly about the challenges she faced in introducing both ICT and interactive pedagogy into her (mathematics) teaching for the first time, the benefits to students, and the qualities she needed as a teacher to make the shift successful.
![]() Think Pair Share (11 min). What does interactive teaching offer you? Share your thoughts with the whole group.
Think Pair Share (11 min). What does interactive teaching offer you? Share your thoughts with the whole group.
move to 1.3 after a max. of one hour
Planning an activity - “activity template”
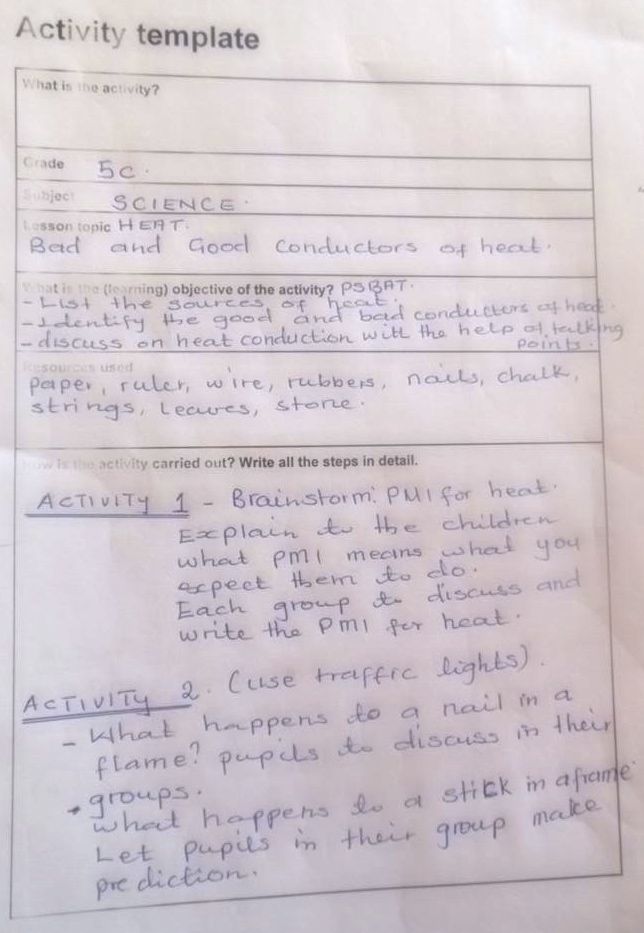
In this section, we consider strategies to incorporate new interactive elements in your lessons, including things you might say, and things you might do. To help you structure your planning, we provide an activity template. It includes:
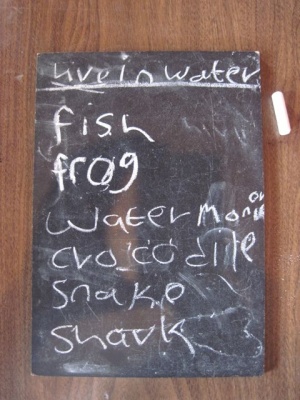
- what the activity is (a technique such as a brainstorm, group work, mini blackboard use plus an activity in which it is used, eg “a brainstorm on what animals are found in your environment”),
- the grade,
- the subject & lesson topic,
- what the (learning) objective of the activity is (e.g. to find out what students already know about topic X),
- resources to be used (such as blackboard, mini blackboards, paper, objects, etc), and
- how is the activity carried out.
![]() Pair activity (11 min). Watch the following video sequence and pause after each clip to discuss with a partner: What would you record on the template to capture this activity? (There is no need to actually write on it.)
Pair activity (11 min). Watch the following video sequence and pause after each clip to discuss with a partner: What would you record on the template to capture this activity? (There is no need to actually write on it.)
![]() Stimulus (11 min). Eness_vertebrates_clips 2,4,6,8: (1 min. 40, 2 mins. 43, 3 mins. 43, 7 mins. 03 = 15 mins. 09 total)
Stimulus (11 min). Eness_vertebrates_clips 2,4,6,8: (1 min. 40, 2 mins. 43, 3 mins. 43, 7 mins. 03 = 15 mins. 09 total)
VIDEO
Eness_vertebrates_2.mp4
The description of the video
Video/Eness vertebrates 2.mp4, https://oer.opendeved.net/wiki/Video/Eness_vertebrates_2.mp4, Duration: 1:40 watch on YouTube, local play / download options / download from dropbox)
VIDEO
Eness_vertebrates_4.mp4
The description of the video
Video/Eness vertebrates 4.mp4, https://oer.opendeved.net/wiki/Video/Eness_vertebrates_4.mp4, Duration: 2:43 watch on YouTube, local play / download options / download from dropbox)
VIDEO
Eness_vertebrates_6.mp4
The description of the video
Video/Eness vertebrates 6.mp4, https://oer.opendeved.net/wiki/Video/Eness_vertebrates_6.mp4, Duration: 3:43 watch on YouTube, local play / download options / download from dropbox)
VIDEO
Eness_vertebrates_8.mp4
The description of the video
Video/Eness vertebrates 8.mp4, https://oer.opendeved.net/wiki/Video/Eness_vertebrates_8.mp4, Duration: 7:03 watch on YouTube, local play / download options / download from dropbox)
TOTAL: 15:09
This video sequence contains four consecutive clips from the same lesson you saw earlier, showing:
- Clip 2: Students hands out blackboards themselves (active)
- Clip 4: Teacher repeats and clarifies instructions; she illustrates them with nonsense classifications so students do not copy hers
- Clip 6: Groupwork using mini-blackboards: group of 5 recording under their own category of ‘animals with no legs’ and interacting as a group
- Clip 8: Group presentation: teacher detects error and asks for input from children to verify (rather than ‘telling’); she corrects error with input from class.
![]() Whole Group Discussion (11 min). When you have discussed these clips one by one in pairs, continue with whole group discussion on content of clips:
Whole Group Discussion (11 min). When you have discussed these clips one by one in pairs, continue with whole group discussion on content of clips:
- What new techniques was Eness using this time?
- How did she ensure that children were active?
- What role did the mini blackboards play?
- How can teachers create a good relationship with their class so that children can learn?
- What kind of classroom atmosphere supports learning?
[Pair activity] In a pair, plan your own activity for a lesson you are teaching imminently. You may want to pair up with a teacher of the same grade if this is possible.
Choose one of the two techniques below and discuss with your partner what you are going to do. Record this in an activity template.
Questions to help you complete the template for this specific kind of activity:
1. Brainstorm:
- What do I need to know about students’ knowledge or understanding of the topic? What will I ask them to brainstorm?
- What will I do with the results? How will we build on that in the rest of the lesson?
2. Mini blackboard activity:
- Will individuals or pairs have a blackboard?
- What is the purpose of recording on a blackboard? For example, will all learners hold them up to show me their ideas? Will they discuss with peers? Will they record the results of a learning activity? Will they write or draw on the blackboards?
Practical classroom activities and reflection
Introduce the cycle of ongoing reflective practice – comprising classroom activity, (discussion) and reflection.
- Part 1: Plan! (You have just done that)
- Part 2: Teach! (Have your lesson plan to hand.)
- Part 3: Reflect on your own and then with buddy and perhaps a wider group
- Revise plan and repeat cycle
Introduce the notion of a reflective journal to support this whole process.
Questions to guide reflection:
- What did the children get out of the activity? How can you tell?
- How did you (as the teacher) find out what the children learnt / thought about the activities / got out of them?
- What did you (as the teacher) get out of it?
- Did you find it difficult?
- What would you do differently next time?
[Follow-up activity] Record your reflections to be used in the next workshop session.
How do teachers capture reflections? Simplest way is to capture on paper. These can easily be shared. But, teachers can be reluctant, and you may not get anything back. Maybe they just should write some prompts, that will remind them?
For the trial, also use dictaphones. How are the teachers finding that? See more expanded list of questions in the audio diary guidelines.
You need to make concrete plans with the teachers as to when they will be using their activities.
Next time
Don’t forget to bring your activity plans again, and your recorded reflections.
(Use your dictaphone if you have one, or make notes on paper or electronically)
Remind participants to do their activities. They may want to review the notes that have been handed out, as well as read the background text available below.
As the facilitator, you should also do a reflection on how this first workshop went - please see facilitator reflection for Unit 1!
Activity template
The activity template is available on this page for printing: OER4Schools/activity template:
Downloadable version: Activity template.pdf (info)
| What is the activity?
|
| Grade
|
| Subject
|
| Lesson topic
|
| What is the (learning) objective of the activity?
|
| Resources used
|
| How is the activity carried out? Write out all the steps in detail.
|
Here is a photograph of a completed activity template for a lesson on conduction. Note that one template can be used for multiple activities:


